
Your Saunas.org sauna has arrived! You are ready to begin your journey through infrared sauna therapy and are on the brink of transformation into optimal health and well-being. Follow this easy to use guide to ensure that your sauna is assembled correctly and safely. You are just a few short steps away from basking in the warm hues of your infrared sauna and enjoying the myriad of health benefits available through this unique treatment.
What You Will Need To Assemble Your Infrared Sauna
- Two able bodied adults: Ensure that you have two individuals available to assemble your sauna: this is not a one-person job!
- Space in your home: Prepare a level area in your home in advance where you will put your infrared sauna
- Three Pronged Electrical Outlet: Ensure safe electrical access by grounding the electrical system of your home. You will need a three-pronged outlet or surge protector. European customers need the necessary convertor.
- A Printed Manual: Have a printed manual available that you can cross-reference as you assemble your infrared sauna.
- A Screwdriver: Have either a drill or manual screwdriver available before you begin to assemble your sauna.
- Patience: The following guide is easy to follow: However, it can be tedious to assemble any new piece of furniture into your home. Your sauna must be assembled in correct alignment to solidify safe use; additionally you will be working with electricity, which requires a calm and patient mind to establish safety precautions.
Optimal assembly of your infrared sauna can be ensured through proper preparation. Different personality types find this procedure more or less natural to their respective disposition. If you are not predisposed to details, be mindful of enlisting the help of a companion who is. The assembly of your infrared sauna is a partner operation. The paneling can be heavy and both individuals will need to be able bodied and willing to lift. At least one member of your crew should be detailed oriented!!!
Establish an area in your home that will be accessible to an electric outlet that is grounded! Ensure that the electric outlet you use is safe and functioning. If you live in the developing world, for example on a Caribbean island, the electrical outlets are not generally grounded and you will need to move through the process to ground the electricity of your home before assembling your infrared sauna.
Once you find an area in your home that has safe accessibility to an electrical outlet ensure that the floor is flat. You can use a level to determine if the floor space is appropriate for your infrared sauna. If you do not have floor space in your home that is level you may shimmy small pieces of wood shingles under the floor panel of your sauna to establish a level setting.
As you choose the position of your sauna in your home, you want to be mindful that this sauna will become a sanctuary for you. Find a place in your home that is, ideally out of the way from the hustle and bustle where you feel comfortable disrobing and finding quietude to induce deep states of relaxation.
Have a printed manual available to cross-reference as you assemble your guide. The details are important: Ensure that at least one of the adults assembling your infrared sauna is oriented towards reading instructions and will assume the role of detail leader!
Finally, be patient; establishing a firm foundation of a solid structure will allow you to fully benefit from your infrared sauna sessions in a safe environment. The cascade of health benefits offered through spectrum infrared sauna treatment therapy will be at your fingertips, in the comfort of your own home. Patiently assemble your infrared sauna to ensure safe usage over the course of your journey into this deeply healing treatment.
How Long Will It Take To Assemble?
- One Hour: You do not want to rush the process and therefore miss important details. Set aside at least one hour of your day to properly assemble your infrared sauna. If you finish sooner, this is great, but be sure to be present to the assembly process to establish a safe environment.
As you prepare to assemble your infrared sauna set time aside from your daily schedule and obligations. Put on comfortable clothes that allow you to move and lift heavy paneling. Settle into the process without time restrictions. The smaller two person units will take less time than the larger units. Ideally, set aside an afternoon or evening where you can joyfully assemble your infrared sauna in a relaxed and present state of mind.
Identify Important Components Of Your Infrared Sauna And Clear The Floor Space
- Part Names
- Separate Wood Paneling From Electrical components
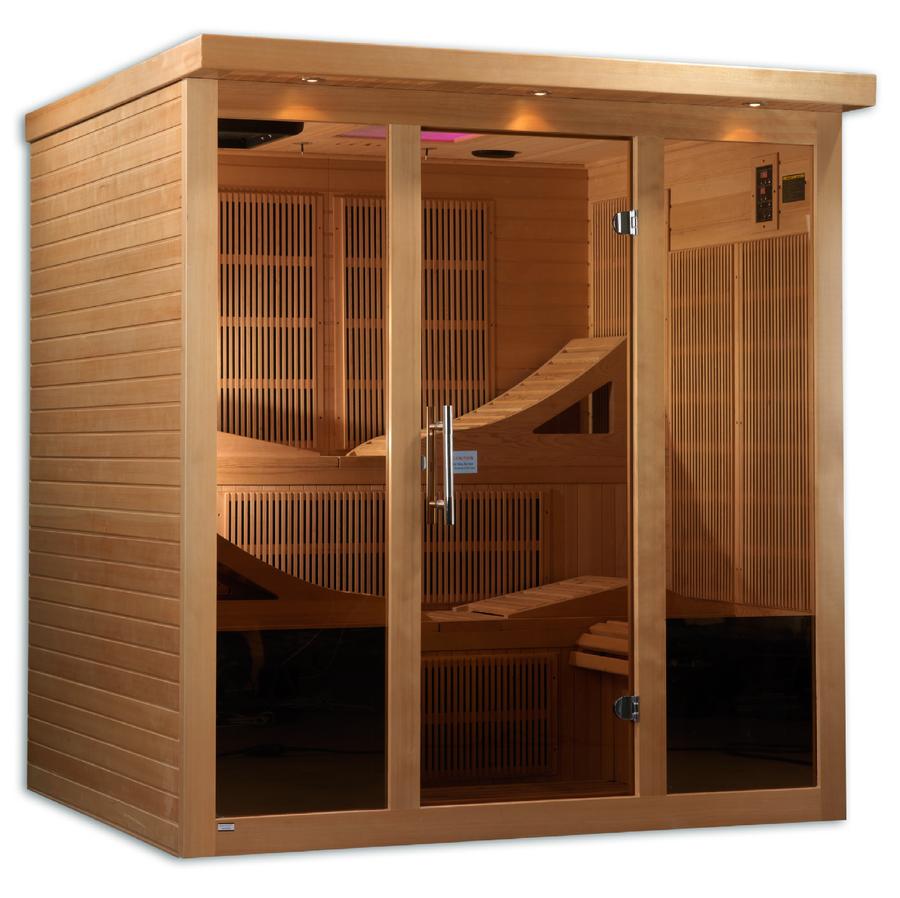
Your Saunas.org sauna will be shipped to you in boxed packaging. Before diving into the assembly process unpack your shipment, identify the different components, for example: the floor base, side paneling, Himalayan salt crystal, and control panel. Separate the wood paneling components from the electrical parts and lay them out in an easily accessible display.
Part Names: Wood Paneling Units
- Top Panel
- Right Panel
- Left Panel
- Bench Panel
- Bench Support Panel
- Floor Panel
- Corner Unit saunas will Also Include: Right Front Panel, Left Front Panel, Back Right Panel, Back Left Panel, Short Bench Support Panel, Short Bench Panel, Long Bench Support Panel, Long Bench Panel.
Electrical Components:
- Control Panel: Timer, Temperature, Lighting
- Far Infrared Carbon Heater
- Near/Mid Ceramic Heater
- Himalayan Salt Crystal
- Internal External Lighting
The components of your infrared sauna should be away from the floor space where you will build your sauna, identified and separated. Ensure the floor is level and the electrical outlet is safe and accessible. You are now ready to start the assembly process!!!
Assemble Wood Paneling
- Understand Panel Locking Mechanism
- Order of Panel Installment
- Create A Level Foundation
The paneling units of your Saunas.org sauna are heavy, be sure to lift by bending the knees and keeping a flat back. Use your inhalation to generate strength in the body and your exhalation to lift paneling unit. Moving in synchronicity to your breath will allow you remain injury free.
Similar to batteries each panel is marked with a ‘+’ sign or a ‘-‘ sign on either end. The ‘+’ marked ends slide into the ‘-‘ ends of each paneling. Lift the end of the paneling marked ‘+’ by 4 inches (10 cm) above the paneling marked by ‘-‘. Once alignment is found you can easily slide the respective paneling into each other. Once alignment is found be sure that the ends are flush with each other. If ends of paneling do not line up, start again and slide back into place. By following this procedure you will ensure that the paneling is safely ‘locked’ into place.
*Please refer to your instruction manual for a visual aid.
Panels should be installed in the following order (There may be some variance depending on sauna model and size):
*Floor Panel> Back Panel>Left Side Panel>Right Side Panel> Bench Support Panel> Front Panel>Top Panel *
1) Place floor panel in your desired location. The floor panel must be level. It is helpful to use a level at this point. If the floor of your home is not flat and level you may shimmy wood shingles under your floor panel to ensure that it is level. Once the floor panel is in place you can measure it by using a level. The floor panel lines and grooves should be parallel to the front wall.
Once the floor panel is in place, take a step back, breath deeply and prepare for installing the right and left wall paneling.
Building The Wood Structure Of Your Saunas.org sauna
- Build Your Walls
- Insert Heat Panels
- Establish Your Bench
- Create The Roof
- Manage Electrical Wiring
- Accessorize: Phone, towel and cup holder
You are now ready to begin to build vertically to create the structure of your infrared sauna. Here are fifteen easy steps you can take. Move through slowly in sequential order. It is necessary to follow the numerical ordering of these steps to ensure functionality and safety.
1) Both partners building your Sauna unit should pick the left rear panel up off the ground vertically. Move the left rear panel into position over the floor panel. Lock the panel of the vertical wall into the available slots on the floor panel. Be mindful to create a ‘lock’ between the left rear panel and the floor panel.
2) Both partners will need to lift the right and left rear side panels up and maneuver them into position above the floor panel. Lifting the walls up gently easing them into the slots of the floor panel. Confirm that the ‘lock’ has been established as described above.
3) Lift the left side panel up vertically, move it into position and gently slide it into the slot of the floor panel. Lock the left side panel into position.
4) Retrieve the bench support panel and the bench surface panel. The bench support panel should slide into the floor panel, ensure that the bench support is fully integrated into the corresponding slots in the floor to create a ‘lock’.
5) The bench support panel should face the Himalayan salt wall and heater outward, facing the front of the unit.
6) Connect the power connector from behind the bench support panel into the floor panel.
7) You will find a second power connection in the bench support: connect this to the right wall panel.
8) Ensure that the power connection is secure and fastened.
9) Place the bench panel on top of the bench support panel and slide into place along the back wall. There should be a ‘lock’ surface ought to be flush with the bench support.
10) Retrieve the front panel and lift it up vertically, one partner should be on either side. Gently slide the front panel into the slots in the floor to ‘lock’ into position, ensure that the front panels are also ‘locked’ into the right and left side panels.
11) Identify the roof panel. This panel is particularly heavy. Ensure that both partners are prepared before lifting into position. Place the roof panel above the four side panels.
12) The connection wires from the three side panels should protrude through the corresponding holes of the top panel. Align the top panel’s air vent to the corresponding back of the unit wire holes.
13) The trim of the top panel should easily fit around all side panels and front panel.
14) The wires on the top of the left, right, back and front panel should protrude through the top panel: plug each of the wires into the matching connectors on top.
15) Identify and retrieve the wooden phone, cup, and towel rack. Choose where your ideal placement should be for your own needs and usage. The placement of these accessories will be permanent. Take your time before deciding where they should be located. You will need a drill or a screwdriver. You will mindfully attach these accessories to the sauna walls.
Power ‘On’ Your Infrared Sauna And Learn To Operate The Control Panel
Now that your Saunas.org sauna structure has been created you can plug your three-pronged plug into your home outlet.
Once electrical connection has been established you can begin to understand how to operate your control panel.
1) ‘Power’, press this button to switch on or off.
2) ‘Time’, will control the operation time, the numbers revealed let you know how much time is left in your session. The default time will always be set to 45 minutes. The Up and Down button will allow you to adjust the quantity of time the infrared sauna is operating. (The maximum operating time is 60 minutes)
3) ‘Temp’, symbolizes the set temperature. Your infrared sauna will automatically be set to 120 degrees Fahrenheit. You can choose to read your temperature in Celsius symbolized by ‘C’ or Fahrenheit, symbolized as ‘F’. Press ‘High’ or ‘Low’ to increase or decrease temperature. The maximum temperature you can set is 150 degrees Fahrenheit or 60 degrees Celsius. Once the temperature is set, the numbers will flash. After flashing occurs the actual temperature of the space will be indicate.
4) Internal light, press on or off to light the internal space.
5) External light, press on or off to the light the external space.
Using your control panel is simple. All of the corresponding buttons express an actual command. Remember to acclimate your body to higher temperatures and longer time spent in the sauna over a three-week period. You will find that the control panel is self-explanatory.
Medical Grade Light Therapy: Control Your Light Setting
Your infrared sauna will come equipped with your medical-grade LED lighting. You can choose to allow the broad spectrum to cycle through automatically, or choose the infrared light that corresponds to your desired effect and stay with it for a period of time. By pressing the button twice you will be able to choose your color light for your desired duration. By pressing the button once, the broad spectrum of colored lights will cycle automatically, giving you 8 seconds of exposure to each color.
Take some time to read other articles of the Saunas.org website to decide what color choice is best for you.
Technical Issues Or Questions With Your Saunas.org sauna Assembly
Your Saunas.org sauna will come with an easy to use manual. The assembly will be simple provided you follow the guidelines outlined above. Be sure to have a partner on hand to assist you with heavy lifting. Follow all instructions numerically.
Should you face any challenges beyond the scope of what you can manage you can always call Saunas.org directly (1-800-979-8971) to speak to a representative who will assist you with the assembly or email Saunas.org staff (Saunas.org) with any particular inquiries. Be sure to keep a copy of your manual handy, in the event that you need to refer to it at any time.
Power Your Saunas.org Sauna On And Enjoy The Journey
Your infrared sauna has arrived and you have successfully assembled it in the desired location in your home. True transformative healing is now available to you in the comfort of your own home. Relax and enjoy your first sauna session and let the cares and worries of the world roll off your shoulder as easily as sweat gently drops off your body.
Contraindications:
1) Assembly of your home infrared sauna requires two people.
2) If you are stuck and do not understand the next step in the assembly process, reach out to Saunas.org for further clarification.
3) Read articles from the Saunas.org website, especially: ‘How To Use An Infrared Sauna’, to maximize the benefits of your infrared sauna therapy.